Creating Foldouts
When creating text there is a possibility to integrate foldouts.
There are different ways to create a foldout.
If you select the button “create foldout” in the toolbar a foldout appears in your text area.

You can now enter a title in the gray area.
The content can be entered in the white area below.
You can open and close the foldout using the arrow on the right.

If you already created the content and want to add it into a foldout afterwards you can do so by highlighting your content first. After selecting the “create foldout” button in the toolbar the foldout will appear in your text area. This time the white area will be filled with the content you highlighted before.

You have the opportunity to delete the foldout. You can do so by clicking on the foldout with the right mouse. Now you can decide whether you want to delete the foldout completely or whether you want to keep the content.
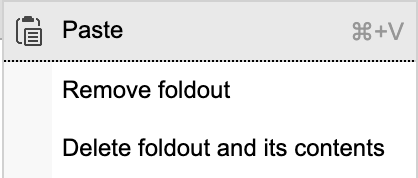
If you decide to keep the content the foldout will disappear and the content will be adopted to your text.
Tip: If you save your text while the foldouts are opened they will always be displayed opened in your text. If you would like for them to be displayed closed they have to be closed before saving the text.
Note: Foldouts can be used on pinboards, too.